Group curators

Akiba
Freaklabs

Jacinta Plucinski
Freaklabs
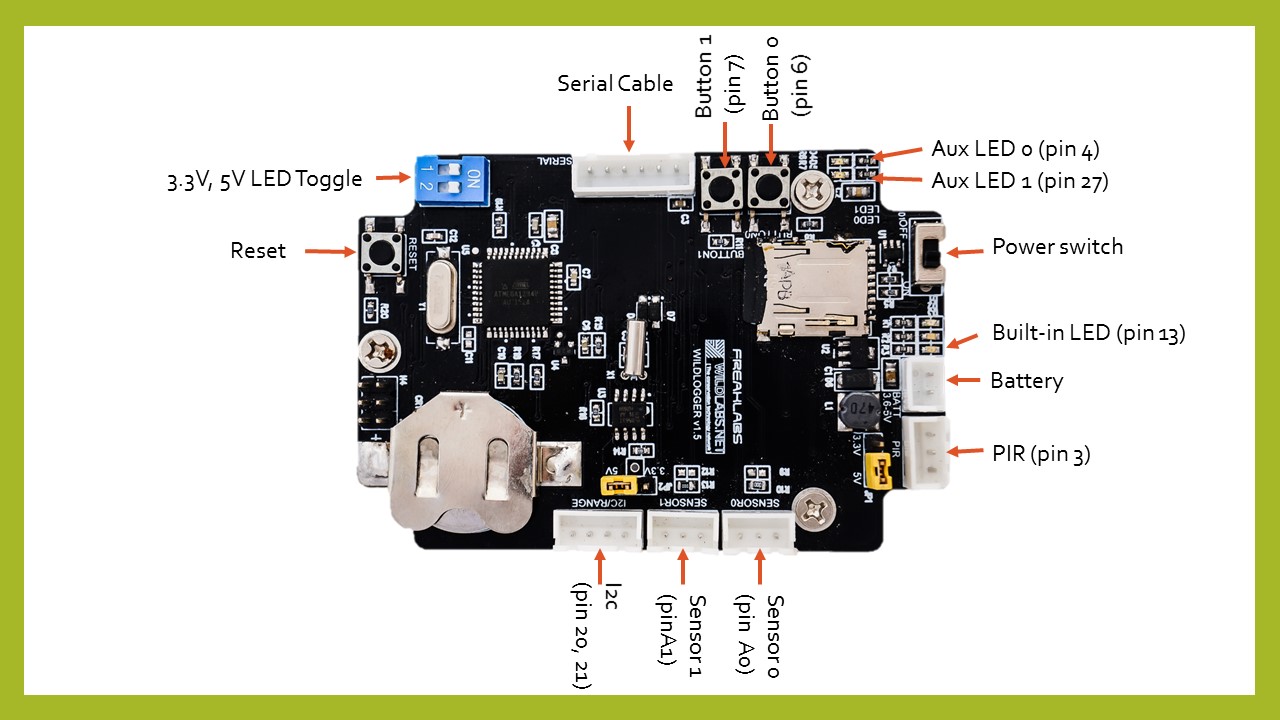
Ready to put your Tech Tutors skills into practice? WILDLABS and Freaklabs are proud to announce our new virtual course: Build Your Own Data Logger. This eight-part video tutorial series will guide wildlife and conservation researchers through building and deploying custom hardware using the Arduino platform. To join, Register now!
This course is free to all, but if you would like to build along with the course in real-time, you can purchase the WildLogger board and kit for $30 (USD) here
About the Series
If our first season of Tech Tutors inspired you to put your conservation tech skills to the test, we've got a brand-new experience coming to WILDLABS! Where can you start learning how to use Arduino to build custom devices for wildlife and conservation research? Right here!
Beginning this November, WILDLABS and Freaklabs are proud to introduce an eight-part video tutorial series that guides wildlife and conservation researchers through building and deploying custom hardware using the Arduino platform. The series will use WildLogger - an Arduino-based board that’s designed for deployment - to create a custom data logger.
Are you new to Arduino, or maybe not entirely sure what Arduino is? Good news - this series is for beginners like you! By the end of our eight modules, you'll have the practical skills and knowledge base you need to deploy your creation for real.
The series assumes no hardware experience. It’ll cover common terminology, components, the hardware design stack, setting up the Arduino environment, programming and optimising your application, choosing and modifying enclosures, piloting, testing, deploying and troubleshooting.
You’re not on your own. Our interactive series makes it easier than ever to get feedback and guidance as you learn. Every two weeks, we’ll host a live Office Hours event to troubleshoot, answer questions in person, and release the next module in the series. We'll also have cheat sheets and code to download, plus a forum to ask questions between sessions. And of course, you can build along with the course in real-time with the WildLogger board and kit, available here.
The tutorial is free and allows you to move at your own pace with videos available to all on the WILDLABS Youtube channel. To navigate through all course content, visit the Course Directory.
To join this virtual course, register here!
Group curators

Freaklabs
I'm an engineer and product designer working on wildlife conservation technology.


- 0 Resources
- 271 Discussions
- 13 Groups

Freaklabs
Develops open source technology for wildlife and conservation researchers

- 0 Resources
- 11 Discussions
- 2 Groups
Royal Society for the Protection of Birds (RSPB)
A technologist and a conservationist

- 0 Resources
- 22 Discussions
- 5 Groups

- @foxy50213
- | Mr.
- 0 Resources
- 0 Discussions
- 8 Groups
Freaklabs
I'm an engineer and product designer working on wildlife conservation technology.
- 0 Resources
- 271 Discussions
- 13 Groups

Founder & CEO of we.are.tohorā, creating a community that cares about whales, the environment and each other.
- 0 Resources
- 0 Discussions
- 13 Groups

- @snapshot_serengeti
- | she/her
Fauna & Flora
Conservation, Innovation, Education

- 7 Resources
- 21 Discussions
- 9 Groups

- @StephODonnell
- | She / Her
WILDLABS
I'm the Community Manager at WILDLABS


- 151 Resources
- 656 Discussions
- 30 Groups
- @dterlip
- | He/Him
Career technologist looking to move into the conservation space
- 0 Resources
- 1 Discussions
- 3 Groups

- 0 Resources
- 0 Discussions
- 5 Groups

- @LindyClydeKnowles
- | he/him

- 0 Resources
- 6 Discussions
- 6 Groups

Wildlife Drones
Wildlife Drones has developed the world’s most innovative radio animal-tracking system using drones so you can track your radio-tagged animals like never before.

- 11 Resources
- 8 Discussions
- 32 Groups
I'm a wildlife ecologist with interests in a range of technology.
- 0 Resources
- 20 Discussions
- 5 Groups

CIBIO-InBio
I am a PhD student working on wolf bioacoustics. I am combining Audiomoths and Deep Learning into more efficient wolf monitoring protocols. My main field of interest is population ecology.
- 0 Resources
- 0 Discussions
- 3 Groups
Careers

The primary focus of the research is to explore how red deer movements, space use, habitat selection and foraging behaviour change during the wolf recolonization process.
10 February 2024
Careers
Mobile App. Developer / Gibbon Research

Kyle Winney
Can you create an ecological data collection application on Android for Gibbon and Biodiversity Research. Check out this opportunity with us!
24 August 2023
Careers

We are recruiting a graduate student to work on a 3D groundwater flow sensor in collaboration with USGS. Experience with C/C++ or similar programming languages is preferred, but not required.
12 July 2023
Careers
Postdoc for electrical engineering at NASA

Roland Kays
Spaceborne Satellite-tag RF Systems to Measure Spatiotemporal Patterns of Wildlife
12 July 2023
Careers
Wildlife Monitoring Engineer

Tom August
Permanent and Full Time role at the UK Centre for Ecology & Hydrology
8 June 2023
Careers
Junior Electrical Engineer (Hardware)

Lindsay Starke
As the FieldKit hardware ecosystem grows, Conservify is seeking a Junior Electrical Engineer to assist with testing, troubleshooting, prototype development, and developing production test fixtures for our growing...
9 December 2022
Article
Module 8: In the Field

Akiba
Welcome to the eighth and final module of our Build Your Own Data Logger virtual course. We’ve built, coded and tested our data logger. Now we’re taking it into the field.
22 October 2021
Article
Welcome to the sixth module of our Build Your Own Data Logger virtual course. In these videos, we’ll discuss ways to protect devices from water, dust and animals. Then we assemble the WildLogger using cable glands so...
6 September 2021
Article
Welcome to the seventh module of our Build Your Own Data Logger virtual course. In this module, we take our fully assembled system into the lab, sandbox and pilot test environments.
6 September 2021
Article
Welcome to the fifth module of our Build Your Own Data Logger virtual course. In these videos, we’ll optimise our data logger application, and add the finishing touches to application code so it’s ready for deployment.
25 May 2021
Article
Welcome to the fourth module of our Build Your Own Data Logger virtual course. In these videos, we'll tie everything we've learned so far together by creating our functional data logger application.
11 February 2021
Article
Module 3.6: Interrupts
Akiba
Welcome to the sixth and final part of Build Your Own Data Logger module 3. This new module covers interupts, PIR motion sensors and setting timers and alarms on our real time clock.
29 January 2021
November 2023

| Description | Activity | Replies | Groups | Updated |
|---|---|---|---|---|
| Congrats @MattyD797 and team!!! We do a lot of work in the underwater bioacoustic realm and your tool certainly seems like it would be a great instrumental addition to the... |
|
Acoustics, Build Your Own Data Logger Community, Marine Conservation, Protected Area Management Tools, Sustainable Fishing Challenges | 1 week 4 days ago | |
| You mention you're working with an engineer, here are a couple of pointers:with an SDR (the "digital USB receivers" you mention) you can scan some bandwidth to detect radio pulses... |
|
Biologging, Build Your Own Data Logger Community | 2 weeks ago | |
| First things first, our team, @jcguerra10, @hefca, and myself, is thrilled to share with immense pride... |
|
Build Your Own Data Logger Community, Data management and processing tools, Sensors | 2 weeks 5 days ago | |
| Thank you all for this advice! I'll be looking into all of these options. I really appreciate you all taking the time to think about this.I ran out of time to pull this together... |
+11
|
Build Your Own Data Logger Community | 3 weeks 6 days ago | |
| Am working on similar AI challenge at the moment. Hoping to translate my workflow to wolves in future if needed. We all are little overstretched but it there is no pressing... |
|
Camera Traps, AI for Conservation, Build Your Own Data Logger Community, Data management and processing tools, Marine Conservation, Protected Area Management Tools, Remote Sensing & GIS | 2 months 3 weeks ago | |
| I dont have anything written up but I can tell what parts we used and how we tested.Its pretty straightforward, we used this M10 Enclosure Vent from Blue Robotics: Along with... |
|
Build Your Own Data Logger Community, Acoustics, Camera Traps, Climate Change, East Africa Community, Marine Conservation, Open Source Solutions, Protected Area Management Tools | 3 months ago | |
| Makes sense if you have the cash... |
+8
|
Biologging, Climate Change, Sensors, Build Your Own Data Logger Community, Emerging Tech | 6 months 3 weeks ago | |
| ooh very cool Salman! Amazing how much tracking devices have come down in price over the years and LoRa/LoRawan is just such a perfect fit for GPS data. Thanks heaps for sharing.... |
|
Build Your Own Data Logger Community, Open Source Solutions | 7 months 1 week ago | |
| Yes, but for our needs that are not powerful enough |
|
Acoustics, Build Your Own Data Logger Community, Camera Traps, Emerging Tech, Open Source Solutions | 1 year ago | |
| Hey Tom,Since the output is dependent on a couple of factors such as the solar irradiance of the place, shading from the canopy, the type of solar panels (mono, poly or amorphous... |
|
Autonomous Camera Traps for Insects, Build Your Own Data Logger Community, Camera Traps, Conservation Tech Training and Education, Sensors | 1 year 2 months ago | |
| You can try Frank G.. He's a fantastically innovative engineer who founded and rubs the Maker's Space at Barstow College in Barstow, Calif. Frank is very familiar with... |
|
Build Your Own Data Logger Community | 1 year 4 months ago | |
| HI Wayne. Sure. The main thing is selecting and interfacing the sensors that you'd need. If you had a water meter that fed out the data, then you could just timestamp it and... |
|
Build Your Own Data Logger Community | 1 year 5 months ago |


Module 3.2: Temperature and Humidity Settings
Akiba
8 January 2021 12:00am
Module 2: Setting up the Arduino IDE
24 November 2020 12:41pm
7 January 2021 6:08pm
Oh great. That makes me feel better also. Hope you have a stable development system to work off of. Great things still need to be made!
Akiba
7 January 2021 7:39pm
@Jeffm Oh that's great to hear. We've had a couple of cable issues so far, but I'm really glad you got the problem sorted. Onward and upward!
Akiba
BYO Holiday Break Project Log + Schedule Update

22 December 2020 10:05pm
2 January 2021 12:17am
Happy 2021 Robin!
We hear you. The holiday season was brutal for Jacinta and I. We're just getting back into the swing of things now and resuming the video production. Looking forward to (hopefully) a better 2021 :)
Akiba

5 January 2021 2:13pm
Just set the RTC. Thanks for the update ;-)
5 January 2021 3:09pm
Ha ha ha. it will be much more important than that later on.
Stay tuned :)
Akiba
USB dongle

7 December 2020 10:13pm
8 December 2020 10:14am
Oh, I understand now. Thanks for the clarification.
Roy
4 January 2021 4:55pm
How do you get the cables through the white plastic sticking out bit? Mine seem to be too wide to fit through
4 January 2021 5:19pm
Hi Liam.
To get the cables through the cable gland, we'll need to remove the wires from the terminal housing and then reinstall them. That will be in a later module.
Akiba
Module 3.3.3 why is pinBatt an int?
23 December 2020 2:42pm
28 December 2020 2:57pm
Hi Akiba, Jacinta,
Jjust to say I've complted all the videos through to end of 3.3.1b successfully - no problems! It snowed here in the North of England last night, so was measuring temperature today!
Many thanks
Rob
4 January 2021 9:49am
Thank you very much - that is very helpful. Knew there had to be a logical explanation behind it.
4 January 2021 9:50am
Thank you, that's very helpful. Nice to see it is a shortcut.
Useful Resources (add your own!)
11 November 2020 10:56am

25 November 2020 11:12am
Ed Mallon (Cave Pearl Project) is exceptionally complete in regards to temperature measurement. Not as easy as it seems!
Excellent links!

8 December 2020 12:28pm
Hi Everyone.
Just thought I'd add this to the list, as I have found it very useful.
Practical Electronics for Inventors by Paul Scherz and Simon Monk. (ISBN 978-1-25-958754-2)
It does the "high level" stuff and the detailed stuff very well and covers a lot of the devices and functions you may think of using in a project.
Cheers
Sean
1 January 2021 11:53am
Hi everyone,
while beeing separated from my Wildlogger board I still had to play with some sensors ;-)
Ceck out this wonderful project: https://sensebox.de/en/
Great to learn coding with this nice blockly interface:
https://blockly.sensebox.de/ardublockly/?board=sensebox-mcu&lang=en#
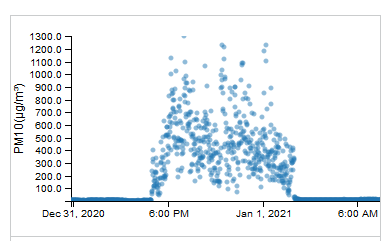
I had lots of fun monitoring the particulate matter influx from the illegal fireworks ;-)
Greetings from Austria,
Robin
Module 3.1: Programming Basic Functionality
Akiba
1 January 2021 12:00am
Module 4 and 5
22 December 2020 9:09pm
22 December 2020 9:59pm
Hi there! Yes, we're in the process of working out the new schedule - several of the modules have ended up being longer and more in-depth than we originally expected, so we've postponed them until after the holiday break to give everyone a chance to catch up on the first part Module 3. You can expect the second half of Module 3 after the New Year, and Module 4's release announcement will come soon after that.
Sorry for the confusion, hope this helps!
-Ellie
Module 3.1.1 The Arduino Command Line.
21 December 2020 7:06pm
21 December 2020 11:29pm
Hmm.. that's strange.
I copied and tested your code (as above), and it works as expected. I get the 'command not recognised' initially, and then 'hello command line' when I type in hello.
At the bottom of the serial monitor, can you check it's set to 'carriage return' and 57600 baud (see images below)?
After the serial monitor is open, the output will be blank.
If you put your cursor in the text input field, and press enter, it should return ''Cmd: Command Not Recognised".
If you put your cursor in the text input field and type 'hello', it should still return the 'hello command line' as per the function.
I've attached screenshots of the two scenarios above.
Can you share what you're typing into the serial console, and what's being returned?
thanks
Jacinta


22 December 2020 10:48am
thanks jacinta. it worked again. The problem was I couldnt exactly see How yall set up the serial monito in the video, because all the links to future videos actually covered the bottom that showed that part. Sorry about that.
22 December 2020 11:09am
Oh! Okay that's good to know, we'll move the links.
Code Module 3-3-3b

21 December 2020 7:22pm
21 December 2020 9:34pm
Hey Paul,
The #include macro, #define constants and pinBatt variable declaration need to sit outside the setup function at the very top.
Declaring pinBatt outside of the setup loop, means it becomes a global variable which can be accessed by any function in the program.
So, currently what's in the first loop function, should be in the set up function, and there should be only one loop function.
So code should look like ...
#include <cmdArduino.h>
#define ADC_UNITS 1024
#define ADC_REF_VOLTAGE 3.3
#define ADC_SCALE_FACTOR 2
int pinBatt = A6;
void setup() {
// put your setup code here, to run once:
pinMode(pinBatt, INPUT);
Serial.begin(57600);
Serial.println("Module 3-3 Lab 3a: Battery Status");
cmd.add("batt", cmdBatt);
}
void loop() {
cmd.poll();
}
Here's some further info on #include libraries, #define constants and global variables if you're interested
# include
https://www.arduino.cc/reference/en/language/structure/further-syntax/include/
#define
https://www.arduino.cc/reference/en/language/structure/further-syntax/define/
Global variables and scope
https://www.arduino.cc/reference/en/language/variables/variable-scope-qualifiers/scope/
hope that helps!
Jacinta
22 December 2020 3:09am
Ah yes! Rookie mistake and soon as I saw your response I remembered the #include #define needed to be outside the setup.
Thank you!
SD Cards and Reliability
10 November 2020 1:02pm
18 December 2020 5:15pm
Just saw this in the digest listing -- I'd hit the same problem with the WiFi SD cards being power hungry so we're developing something ourselves with Bluetooth, WIFI and LoRa. Currently pursuing funding to be able to develop it faster, but the intention is to opensource -- so would love to colaborate if anyone has interest/input/use cases? My PhD is in low power wireless sensor networks so nice to have a project it can actually be useful for. Providing we can get funding we'll have some 'free to you' prototypes for field testing.
19 December 2020 9:29pm
Hi @openlx
Sounds very interesting and love to hear more. So would your system work as a replacement SD card, or work with an existing card/card holder. I think there's a lot of potential for any conservation technology that uses SD cards, including camera traps. And can I ask what sort of ballpark levels of funding are we talking?
Cheers,
Rob
20 December 2020 5:36pm
It would slot in to replace the usual SD storage card, with power, controls and antenna etc. hanging off thin wires -- the idea being to fit as many existing products as possible. Looking to raise about £10k for the proof of concept and then same again for certification and initial run.
Code location online?
16 December 2020 6:33pm
Module 3.1: Programming Basic Functionality
7 December 2020 10:38pm

14 December 2020 4:56pm
When you get a chance, can you please upload PDF's of the slides for the 3.2 videos? Thanks!

14 December 2020 6:07pm
Hi Akiba,
The problem was in the carriage return !
If this option is not activated, the commands entered in the serial port do not produce the correct sequence
Now it's fine !
Thank you !!
15 December 2020 2:12pm
@vickiedenicola
In your code to set the baud rate you write: cmd.begin(57600);
Have you tried this with: Serial.begin(57600);
Western Hemisphere Office Hours Today!
15 December 2020 1:10pm
Microphone and ePTFE
11 November 2020 6:58am
16 November 2020 4:41pm
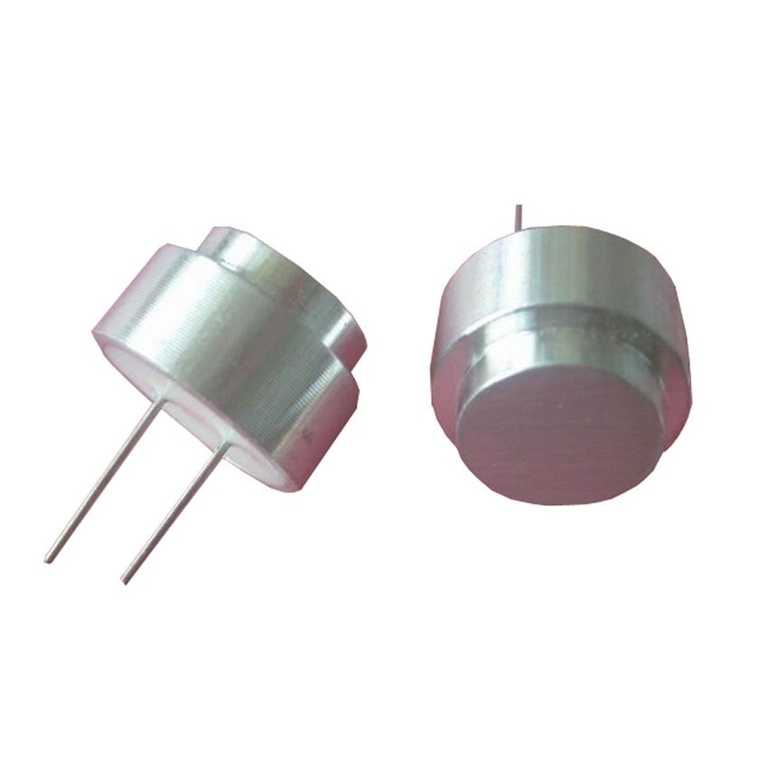
Would ultrasonic trransducers also work as ultrasound microphones? If so, there are waterproof ultrasonic transducers that exist. It's possible to encase these either in silicone rubber, epoxy, or stuff into a cable gland to have a waterproof ultrasonic microphone. I've attached a pic of one for reference.
Akiba

8 December 2020 9:16pm
Hi Cryssy,
I am also looking for membranes to waterproof mics used for recording bat ultrasound. The people at Open Acoustics Devices is using Porelle® AV5ID acoustic membranes for the AudioMoth moulded case (https://github.com/OpenAcousticDevices/Application-Notes/blob/master/An_Injection_Moulded_Case_for_AudioMoth.pdf). I wonder if someone in the WildLabs Community may know how to get them in small quantities. I have only found dealers that sell them in large quantities (+2000), I guess for the cell phone market (for example, https://selectronix.co.uk/collections/waterproof-acoustic-vents/products/black-acoustic-vent-11x5mm-ip68-3m-30min).
Let me know if you find something,
Best wishes, Toni
9 December 2020 2:04am
Hi Toni.
We have some ePTFE samples that we're testing for the webshop. If you're interested in characterizing ePTFE samples for high frequency audio, we can send some out to you.
Akiba
North/Central/South America (western hemisphere) viewing party?
13 November 2020 3:13pm
1 December 2020 12:07pm
Hi. Just an FYI. I asked Carly if we were meeting weekly and she said it was going to be bi-weekly. So as far as I know, there's no watch party tomorrow. Is this correct? If so, then I think the registration needs to be updated since it filled my calendar with weekly events instead of bi-weekly events.
Thanks.
Akiba
2 December 2020 1:03am
Hi Akiba,
Yeah that's right, it's bi-weekly, so next Tuesday will be the next event! I'll see if Carly can change the registration details so it'll show the new schedule.
7 December 2020 5:15pm
Hi all!
So the next Western Hemisphere office hours will be NEXT Tuesday (Dec 15) at 5pm EST/2pm PST. Since the module videos and info are released today and every other week from today, we wanted to give folks a chance to work through stuff on their own a bit and then come prepared with questions/problems for the office hours. For those who've already registered through the Zoom link, I just re-sent the confirmation email with the updated dates. To anyone who wants to join in, register here!
-Carly
BYO Data Logger: Introduce Yourself!
6 November 2020 8:20pm
2 December 2020 9:07am
Hi Greg.
Wow, I'm glad the boards got to you. Jacinta and I are still working on the modules and I'm discovering creating video takes much longer than I had anticipated. Jacinta's more pro. For the course, we're targeting people that are completely new to Arduino and are deliberately pacing it so that it doesn't overwhelm everyone. But if you have more experience and want to move forward on your own, here's some info and things you can do.
We're running behind on documentation because all our time is taken creating video, assembling kits, and shipping out orders. But I've attached an image that should help out in understanding the pin mappings.
I also recommend you test out the realtime clock and SdFat library on your board. You can download them from the Arduino library manager. Search for Rtc_PCF8563 and also the SdFat library in there. Also, the SdFat uses pin10 for the chip select.
If you run into problems, we'll be dropping the videos for the command line, temperature/humidity sensor, and analog digital converter next Tuesday. Two weeks after, we'll be dropping the videos for realtime clock, SD card, and interrupts.
You might also be interested in the video where we do the toplevel integration for the app and also the power and reliability optimizations. Those come in January.
Good luck and if you get stuck, feel free to ask questions and the course videos will be rolling out soon :)
Akiba
p.s. Once we have everyone on the same page with the fundamentals, then we have some ideas on really interesting follow-on courses/projects that build on that :)
2 December 2020 10:53am
Akiba,
It's great to have an Arduino that integrates most of the things that we need on the board. Previous projects have required a spaghetti of all-too-fragile interconnects. The design seems quite well thought out.
I'll do as you suggest with the realtime clock and SdFat libraries. Sharing the sketches on your GiHub repository https://github.com/freaklabs/byo-datalogger/tree/main/WildLogger would be very helpful.
Kind regards
Greg
2 December 2020 12:28pm
Hi Greg.
I'm glad you like the WildLogger. It's actually a variant of a design we use all the time. Jacinta and I come from a background in environmental monitoring and international development. The types of designs and the problems are very similar to wildlife conservation and research. We'd be floundering if we had to design consumer electronic devices. Ha ha ha.
We'll be uploading code to github for the modules as we release the videos. If you want to work ahead and you have questions though, feel free to post here or in this forum.
Akiba
Module 1: Understand the Design Stack
9 November 2020 10:02pm
18 November 2020 11:13pm
Thanks David,
Glad you're finding it useful :)
Also, just to add, yup WildLogger is open source, so feel free to take and adapt :)
cheers
Jacinta
27 November 2020 4:17pm
FYI ordered the 11th, send the 13th, arrived in good order today, the 27th, in the UK .
28 November 2020 12:24am
Hi Egil.
Thanks for the info. It looks like UK deliveries are pretty consistent at around 15 days on average +/- a few days.
We are seeing much more variability for the US which is fast for some and slow for others. If anyone has any questions or wondering about their order, feel free to email us or PM us on Wildlabs.
Akiba
Memory & Power - Alternatives
11 November 2020 10:37am
27 November 2020 12:40pm
Hi Rob.
Congratulations on getting it to work!!
Yes, most batteries come with the JST-PH connector which has a 2mm pin spacing. If you have the equipment and components to crimp on a JST-XH connector which has a 2.54 mm spacing, that would fit into the Wildlogger board. As a warning, the virtual courses and the Freaklabs designs will standardize on the JST-XH connectors with 2.54 spacing because they're compatible with standard electronics prototyping gear like breadboards, and standard 2.54mm (0.100") header connectors. However the JST-XH connectors have polarity (they can only be plugged in one way) and lock (they require additional force to remove) which is why we are using them.
Anyways so if you can crimp on JST-XH connectors, I recommend doing it for your Li-Po (Lithium-Ion-Polymer) battery. For single cell Li-Po batteries, they are compatible with WildLogger and can replace the stock battery case. We used the standard case because we were worried about what kind of batteries were commonly available throughout the world. Alkaline AA batteries are easily found everywhere so we decided to go with those for this first course. That may change in the future or that we offer different battery options for future courses and designs.
Hope that helps.
Also for those that are wondering what JST-XH and JST-PH are, JST is a company that makes a type of connector that is commonly used for cable harnesses. In general, they are commonly used fo batteries, but also for other types of cables. JST-XH is a specific polarized locking cable connector with a 2.54 mm (0.100") pin pitch. JST-PH is a specific polarized locking cable connector with a 2.00mm pin pitch. In general, I prefer polarized, locking connectors because it's not possible to plug them in backwards and because they lock, it's hard to inadvertently pull them out or for them to fall out due to vibration. The standard connectors you might recognize are Molex 2.54 mm connectors which don't have polarity and locking so it's possible to plug in cables backwards and have them fall out. They're okay for general usage, but when possible we use JST-XH. I've attached a pic of Molex 2.54mm connectors and JST-XH 2.54mm connectors below for reference.
Also we will be covering crimping our own cable harnesses later. It's an important skill and cable harnesses are one of those unglamorous things that are critical for devices and deployment but aren't really talked about much.
Akiba


27 November 2020 3:11pm
Hi Akiba,
Thanks for that. I've not added hardware to the Arduino IDE before, so that was useful to learn. I've just got an original Commodore 64, to have a nostalgic retro Christmas, to re-learn BASIC and hopefully learn some machine code & the principles of computer architecture. Hopefully when I turn it on, the smoke will stay on the inside! : )
Yes, it was the male connector on the battery I was thinking of changing (not the female connector on the board). I'm not going to, it was just to check it was OK to do so; if the need ever arose; for future reference. Interesting, I was thinking about the issue of the connectors locking/ pulling out, and their accessibility in the case.
I'd be interested to learn more, as you say in the future about different battery options.
Cheers!
28 November 2020 12:16am
Hi Rob.
The battery connector would be the easiest connector to change from PH to XH. Also the Wildlogger board can tolerate any battery input between 3.6V and 5V. We purposely chose this range so there is compatibility with single cell lithium-ion and lithium-ion-polymer batteries as well which are 4.2V nominally.
Yes, batteries are fascinating and one of the biggest issues we deal with for these types of applications. They're often the limiting factor for drones, tracking collars, and long term monitoring devices. They also don't scale with technology so no matter how tech improves, we still essentially deal with decades old battery technology. Ha ha ha.
Hopefully that seems like it might be changing :)
akiba
Module 2: Setting up the Arduino IDE
Akiba
24 November 2020 12:00am
Office Hours: Module 1
20 November 2020 12:21pm
20 November 2020 2:34pm
Hi everyone.
For this week's office hours, we'll be giving a preview of Module 2 which will be released after office hours and answering questions about Module 1. We'll also be answering any other questions you might have regarding hardware, sensors, datalogging, etc. Looking forward to chatting on Tuesday.
Also we'll be discussing with @carlybatist to arrange that Jacinta and I will be available for the western hemisphere (Americas and Africa) meetup as well. We didn't expect so much geographically diverse interest in the course. Ha ha ha.
Akiba
Module 1: Understand the Design Stack
Akiba
10 November 2020 12:00am
Build Your Own Data Logger Virtual Course
 WILDLABS Team
19 October 2020 12:00am
7 January 2021 5:14pm
Thanks Akiba. I re-installed the driver and that seems to have helped. I appreciate the support.
Jeff